I believe this is why a group of otters is called a raft.
June 16, 2011
June 15, 2011
Ten Myths About Introverts
When I took the Meyers-Briggs personality assessment at the beginning of this school year, it confirmed what I already knew about myself—I am an introvert, a label that might be considered shameful by some, but I’ve accepted it. Not only am I an introvert, but I am a BIG introvert. I did not get a single point in the extrovert column. Not one…

Thus in honor of being labeled as a huge “I”, I present to you 10 common misconceptions about introverts:
Myth #1 – Introverts don’t like to talk.
This is not true. Introverts just don’t talk unless they have something to say. They hate small talk. Get an introvert talking about something they are interested in, and they won’t shut up for days.
Myth #2 – Introverts are shy.
Shyness has nothing to do with being an Introvert. Introverts are not necessarily afraid of people. What they need is a reason to interact. They don’t interact for the sake of interacting. If you want to talk to an Introvert, just start talking. Don’t worry about being polite.
Myth #3 – Introverts are rude.
Introverts often don’t see a reason for beating around the bush with social pleasantries. They want everyone to just be real and honest. Unfortunately, this is not acceptable in most settings, so Introverts can feel a lot of pressure to fit in, which they find exhausting.
Myth #4 – Introverts don’t like people.
On the contrary, Introverts intensely value the few friends they have. They can count their close friends on one hand. If you are lucky enough for an introvert to consider you a friend, you probably have a loyal ally for life. Once you have earned their respect as being a person of substance, you’re in.
Myth #5 – Introverts don’t like to go out in public.
Nonsense. Introverts just don’t like to go out in public FOR AS LONG. They also like to avoid the complications that are involved in public activities. They take in data and experiences very quickly, and as a result, don’t need to be there for long to “get it.” They’re ready to go home, recharge, and process it all. In fact, recharging is absolutely crucial for Introverts.
Myth #6 – Introverts always want to be alone.
Introverts are perfectly comfortable with their own thoughts. They think a lot. They daydream. They like to have problems to work on, puzzles to solve. But they can also get incredibly lonely if they don’t have anyone to share their discoveries with. They crave an authentic and sincere connection with ONE PERSON at a time.
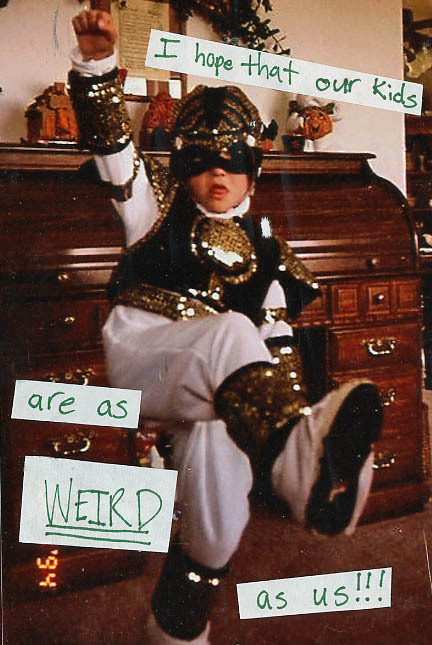
Myth #7 – Introverts are weird.
Introverts are often individualists. They don’t follow the crowd. They’d prefer to be valued for their novel ways of living. They think for themselves and because of that, they often challenge the norm. They don’t make most decisions based on what is popular or trendy.
Myth #8 – Introverts are aloof nerds.
Introverts are people who primarily look inward, paying close attention to their thoughts and emotions. It’s not that they are incapable of paying attention to what is going on around them, it’s just that their inner world is much more stimulating and rewarding to them.
Myth #9 – Introverts don’t know how to relax and have fun.
Introverts typically relax at home or in nature, not in busy public places. Introverts are not thrill seekers and adrenaline junkies. If there is too much talking and noise going on, they shut down. Their brains are too sensitive to the neurotransmitter called Dopamine. Introverts and Extroverts have different dominant neuro-pathways. Just look it up.
Myth #10 – Introverts can fix themselves and become Extroverts.
Introverts cannot “fix themselves” and deserve respect for their natural temperament and contributions to the human race. In fact, one study (Silverman, 1986) showed that the percentage of Introverts increases with IQ.
Thus in honor of being labeled as a huge “I”, I present to you 10 common misconceptions about introverts:
Myth #1 – Introverts don’t like to talk.
This is not true. Introverts just don’t talk unless they have something to say. They hate small talk. Get an introvert talking about something they are interested in, and they won’t shut up for days.
Myth #2 – Introverts are shy.
Shyness has nothing to do with being an Introvert. Introverts are not necessarily afraid of people. What they need is a reason to interact. They don’t interact for the sake of interacting. If you want to talk to an Introvert, just start talking. Don’t worry about being polite.
Myth #3 – Introverts are rude.
Introverts often don’t see a reason for beating around the bush with social pleasantries. They want everyone to just be real and honest. Unfortunately, this is not acceptable in most settings, so Introverts can feel a lot of pressure to fit in, which they find exhausting.
Myth #4 – Introverts don’t like people.
On the contrary, Introverts intensely value the few friends they have. They can count their close friends on one hand. If you are lucky enough for an introvert to consider you a friend, you probably have a loyal ally for life. Once you have earned their respect as being a person of substance, you’re in.
Myth #5 – Introverts don’t like to go out in public.
Nonsense. Introverts just don’t like to go out in public FOR AS LONG. They also like to avoid the complications that are involved in public activities. They take in data and experiences very quickly, and as a result, don’t need to be there for long to “get it.” They’re ready to go home, recharge, and process it all. In fact, recharging is absolutely crucial for Introverts.
Myth #6 – Introverts always want to be alone.
Introverts are perfectly comfortable with their own thoughts. They think a lot. They daydream. They like to have problems to work on, puzzles to solve. But they can also get incredibly lonely if they don’t have anyone to share their discoveries with. They crave an authentic and sincere connection with ONE PERSON at a time.
Myth #7 – Introverts are weird.
Introverts are often individualists. They don’t follow the crowd. They’d prefer to be valued for their novel ways of living. They think for themselves and because of that, they often challenge the norm. They don’t make most decisions based on what is popular or trendy.
Myth #8 – Introverts are aloof nerds.
Introverts are people who primarily look inward, paying close attention to their thoughts and emotions. It’s not that they are incapable of paying attention to what is going on around them, it’s just that their inner world is much more stimulating and rewarding to them.
Myth #9 – Introverts don’t know how to relax and have fun.
Introverts typically relax at home or in nature, not in busy public places. Introverts are not thrill seekers and adrenaline junkies. If there is too much talking and noise going on, they shut down. Their brains are too sensitive to the neurotransmitter called Dopamine. Introverts and Extroverts have different dominant neuro-pathways. Just look it up.
Myth #10 – Introverts can fix themselves and become Extroverts.
Introverts cannot “fix themselves” and deserve respect for their natural temperament and contributions to the human race. In fact, one study (Silverman, 1986) showed that the percentage of Introverts increases with IQ.
June 13, 2011
A Rudimentary Crafting Foray
Five days until the official start of my summer and counting! I’m so excited not even the annoyance of one silly, pointless exam or the overwhelming hurdle of the last anatomy exam can get me too down. For one thing is just about exactly four days I will never again have to set foot in the anatomy lab unless I lose my mind and decide I really like it or something (yeah, like that’s going to happen). As countdowns are dwindling and coastal southern California’s “June gloom” sets in, things for me are becoming more real and more exciting! Even more exciting than the last day of anatomy ever! (Anatomy side note: I have even more respect for doctor’s of my mother’s generation, and earlier I’m sure, who not only suffered through the dehumanization process, gut-wrenching smell, and terrible awful cold that is part and parcel of anatomy, but they did it without gloves, and for some without the benefit of wearing scrubs! I would never have made it that way. I barely made it as it is. Thankfully, I have managed to not lose any of my fingers to frost bite yet) Last week, we got our marriage license. Who knew that passably interesting old (by California standards) buildings existed in Orange County?

Several loose ends for school were tied up and finished off last week as well. I can’t really believe that first year is really almost over and that we all really made it through those 30+ exams that seemed such a daunting number last August. This past weekend was spent with yummy food, cramming in some studying, and apartment hunting! We found a couple places we would very much like to live, but we have to wait a little bit before we get everything settled more firmly. And this week? This week is all about the head and neck and a little bit about everything else in the body.
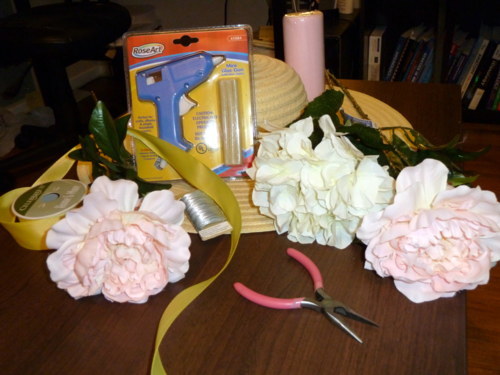
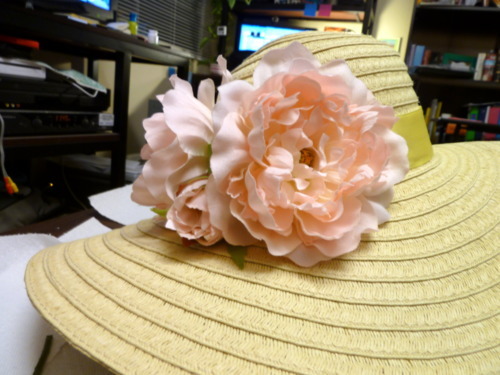
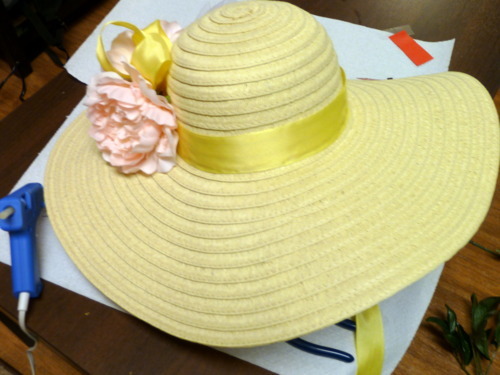
Next weekend is the start of summer, which will kick off with a lovely little themed gathering of some of my favorite people! That brings me to the subject of this non-baking or cooking related post, namely, a craft project in honor of this little shindig. I’m going to preface this by saying this is probably the “craftiest” thing I’ve done/made in a few years. It was pretty fun. To start out this project, you’ll need a glue gun with glue sticks (you can find them for $5! at Target or Michaels), a pretty ridiculous hat to decorate, and whatever it is you want to use to decorate said hat.
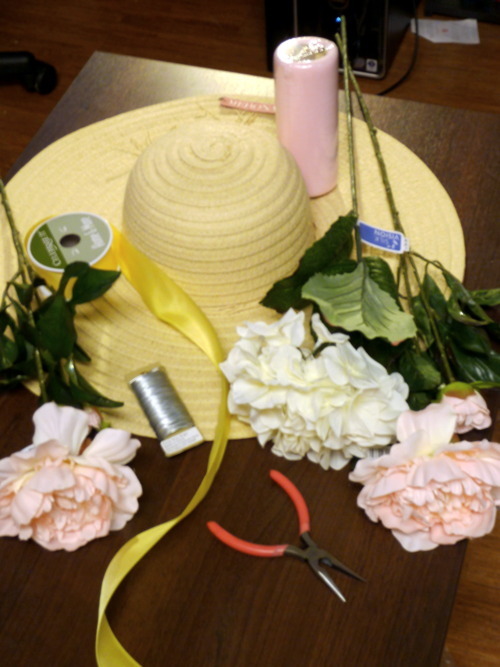
Don’t forget the glue gun!
Something else that would be VERY helpful but is not pictured here is a pair of wire cutters. Without them, cutting the stems off the flowers will take a bit more effort and be a touch lacking in precision. To start out, if your hat has any sort of decoration on it that you don’t want, check to see if it was just glued on. In my case, there was a little string decoration on the hat. To remove it, take a blow dryer and blow it on the glue. The glue will heat up and you will be able to remove whatever it is you don’t want. Remember this technique, it is also your ctrl + z for this little project.
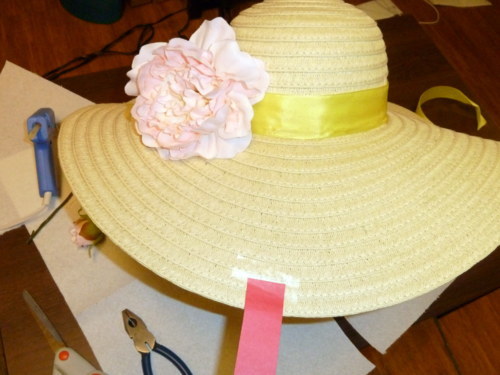
Next, use tape or a post-it to mark either the front of the hat or the part of the hat where you want your decorations. I marked the front of the hat.

Take your wired ribbon (the wire is important) and start gluing it around the base of hat. Make sure you start and end the ribbon underneath where you will eventually be putting the rest of the hat decoration, like I’ve done above. Before you glue down the top half of the end of the ribbon, use your nimble fingers if you’ve got them or some needle nose pliers to pull on the top wire so that the top of the ribbon lies flat against the hat. Bend the wire when you’ve got the ribbon lying how you’d like it. Once you’ve done that, go ahead and and glue down that last corner of ribbon.
Next, cut the stems off the flowers and cut the individual flowers off. Leave a bit of stem so you can glue the flower to the hat still. Practice arranging the different decorations without gluing them down. Once you’ve decided at least on the major components of the decoration you can start to glue them down. You just need a little bit of glue applied to the stem and then press and hold it to the hat for around 15 seconds so the glue has time to set. Careful not to burn your fingers, the glue can get very hot. Also, try not to accidentally let the glue drip on your fingers, they will burn (trust me, it stings quite a bit for a day or so)!
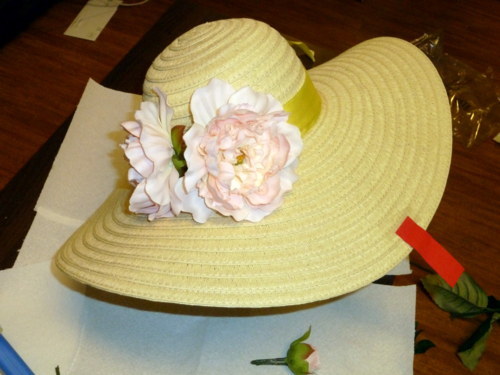
Just keep adding what you want in.
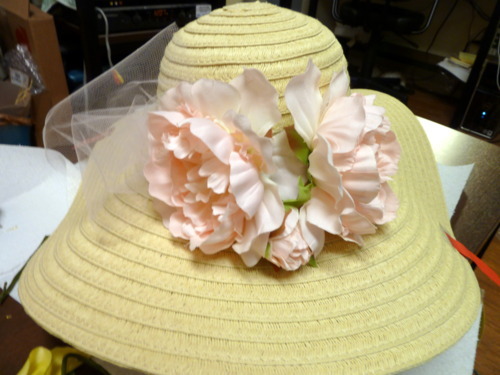
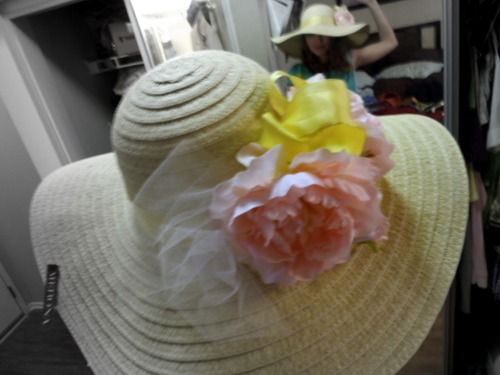
At this point, it took me quite some time to figure out how exactly to finish off the hat. The main objective that remained to fulfill is to cover up the stems so that the mechanics & support of the design aren’t seen from any direction. You can do this with ribbon, netting or tulle, other flowers or buds, feathers, anything you want really. After probably 10-15 minutes of playing around with it, I decided to add some tulle to the back and fill up the space on top, between the two large flowers, with ribbon and another bud. To add netting, tulle, or ribbon, you’re going to use the same technique. You’re going to make some unevenly sized loops of, for example tulle. Once you’ve done that to your satisfaction, take some floral wire (it’s thin and easy to bend) and wrap it around the base of the loops so that they stay. Finally, you will put the glue on the wire and attach it to the hat.
First I added the tulle on the back.
I then played around with the ribbon and bud to figure out how to fill that space in the middle without overwhelming the other elements.
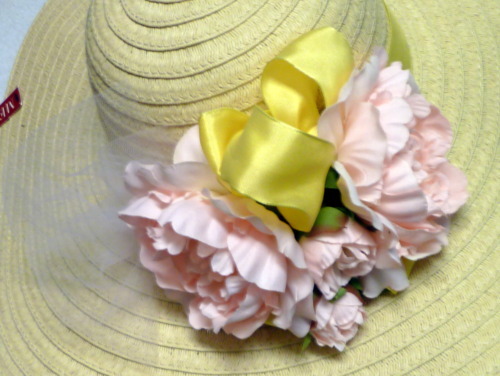
I ended up putting two loops of ribbon (that you can’t see very well) at the bottom of everything and pulling them out a bit underneath the two flowers and on either side of the lower bud. Once you glue the base of the ribbon loops down, you can pull and arrange the loops however you like. Once I did that, I added another bud and some ribbon loops on the top to cover the stems and glue from above.
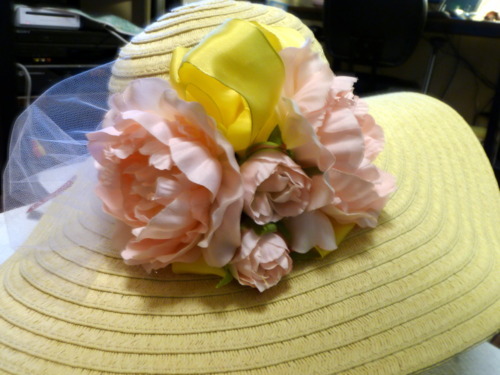
Voila! An awesomely fun and simple hat for a tea, hat & croquet themed shindig. All told, it took me around 2 hours to finish this, however, had I had all the proper equipment (i.e. wire cutters), no distractions, no finger burning incidents, less indecision on design, and a more ideal workspace set up (you know, not sitting on the floor, using a coffee table as the table, and having the glue gun plugged in about 3 feet above my head) it could easily be done in much less time (more like 20-30 minutes).
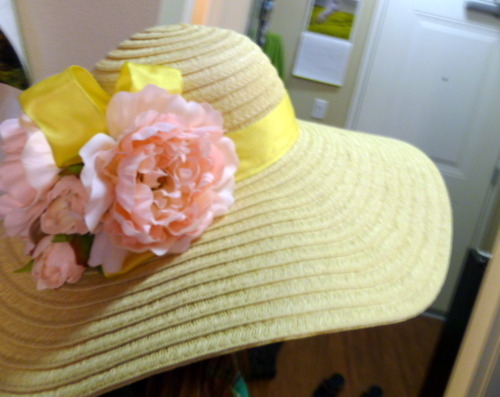
I never thought I’d say this about a craft project, but it was pretty fun. :)
I am very much indebted to these very helpful and instructional videos. I’ve no crafting abilities or know-how whatsoever of my own.
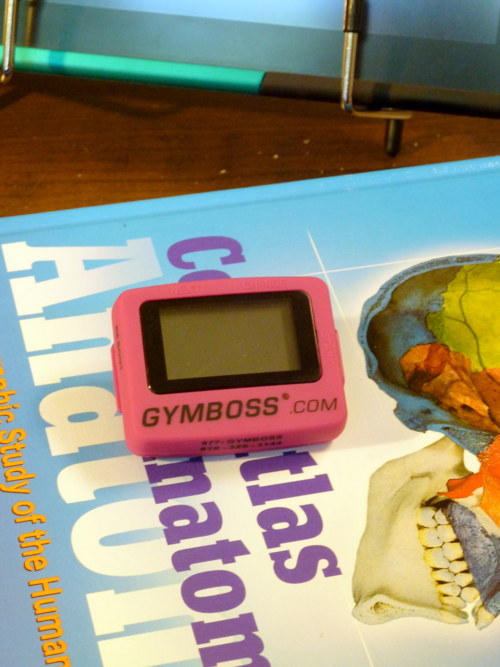
On a side note, I got my Gymboss timer this week!! I’m so excited!
Next week(-ish), carrot cake!

Several loose ends for school were tied up and finished off last week as well. I can’t really believe that first year is really almost over and that we all really made it through those 30+ exams that seemed such a daunting number last August. This past weekend was spent with yummy food, cramming in some studying, and apartment hunting! We found a couple places we would very much like to live, but we have to wait a little bit before we get everything settled more firmly. And this week? This week is all about the head and neck and a little bit about everything else in the body.
Next weekend is the start of summer, which will kick off with a lovely little themed gathering of some of my favorite people! That brings me to the subject of this non-baking or cooking related post, namely, a craft project in honor of this little shindig. I’m going to preface this by saying this is probably the “craftiest” thing I’ve done/made in a few years. It was pretty fun. To start out this project, you’ll need a glue gun with glue sticks (you can find them for $5! at Target or Michaels), a pretty ridiculous hat to decorate, and whatever it is you want to use to decorate said hat.
Don’t forget the glue gun!
Something else that would be VERY helpful but is not pictured here is a pair of wire cutters. Without them, cutting the stems off the flowers will take a bit more effort and be a touch lacking in precision. To start out, if your hat has any sort of decoration on it that you don’t want, check to see if it was just glued on. In my case, there was a little string decoration on the hat. To remove it, take a blow dryer and blow it on the glue. The glue will heat up and you will be able to remove whatever it is you don’t want. Remember this technique, it is also your ctrl + z for this little project.
Next, use tape or a post-it to mark either the front of the hat or the part of the hat where you want your decorations. I marked the front of the hat.
Take your wired ribbon (the wire is important) and start gluing it around the base of hat. Make sure you start and end the ribbon underneath where you will eventually be putting the rest of the hat decoration, like I’ve done above. Before you glue down the top half of the end of the ribbon, use your nimble fingers if you’ve got them or some needle nose pliers to pull on the top wire so that the top of the ribbon lies flat against the hat. Bend the wire when you’ve got the ribbon lying how you’d like it. Once you’ve done that, go ahead and and glue down that last corner of ribbon.
Next, cut the stems off the flowers and cut the individual flowers off. Leave a bit of stem so you can glue the flower to the hat still. Practice arranging the different decorations without gluing them down. Once you’ve decided at least on the major components of the decoration you can start to glue them down. You just need a little bit of glue applied to the stem and then press and hold it to the hat for around 15 seconds so the glue has time to set. Careful not to burn your fingers, the glue can get very hot. Also, try not to accidentally let the glue drip on your fingers, they will burn (trust me, it stings quite a bit for a day or so)!
Just keep adding what you want in.
At this point, it took me quite some time to figure out how exactly to finish off the hat. The main objective that remained to fulfill is to cover up the stems so that the mechanics & support of the design aren’t seen from any direction. You can do this with ribbon, netting or tulle, other flowers or buds, feathers, anything you want really. After probably 10-15 minutes of playing around with it, I decided to add some tulle to the back and fill up the space on top, between the two large flowers, with ribbon and another bud. To add netting, tulle, or ribbon, you’re going to use the same technique. You’re going to make some unevenly sized loops of, for example tulle. Once you’ve done that to your satisfaction, take some floral wire (it’s thin and easy to bend) and wrap it around the base of the loops so that they stay. Finally, you will put the glue on the wire and attach it to the hat.
First I added the tulle on the back.
I then played around with the ribbon and bud to figure out how to fill that space in the middle without overwhelming the other elements.
I ended up putting two loops of ribbon (that you can’t see very well) at the bottom of everything and pulling them out a bit underneath the two flowers and on either side of the lower bud. Once you glue the base of the ribbon loops down, you can pull and arrange the loops however you like. Once I did that, I added another bud and some ribbon loops on the top to cover the stems and glue from above.
Voila! An awesomely fun and simple hat for a tea, hat & croquet themed shindig. All told, it took me around 2 hours to finish this, however, had I had all the proper equipment (i.e. wire cutters), no distractions, no finger burning incidents, less indecision on design, and a more ideal workspace set up (you know, not sitting on the floor, using a coffee table as the table, and having the glue gun plugged in about 3 feet above my head) it could easily be done in much less time (more like 20-30 minutes).
I never thought I’d say this about a craft project, but it was pretty fun. :)
I am very much indebted to these very helpful and instructional videos. I’ve no crafting abilities or know-how whatsoever of my own.
On a side note, I got my Gymboss timer this week!! I’m so excited!
Next week(-ish), carrot cake!
June 7, 2011
June 5, 2011
A Summer Cake
Summer is almost here. It is so tantalizingly close I can taste it! …or maybe that’s just all the strawberries popping up everywhere.
Yes, that is a snowman on that bowl. I’m just a tad bit early for Christmas in July…
Either way, it is time to start breaking out those summer recipes. You know, the ones that are good for summer BBQ potlucks and 4th of July parties? I came across this recipe for a strawberry summer cake last month and fortunately had the perfect excuse to make it last weekend, a very special someone’s 75th birthday! I love this special someone with all my heart as this person put a significant amount of time and effort into looking after me as I was growing up. I now take great delight in being a chauffeur to this person when I can, continuing to listen to her awesome stories, and going out for coffee on weekend mornings. The photos for this recipe were graciously taken by a boy I happen to be particularly fond of. That is why they look so much better than my usual pictures. Being at my mom’s house with huge windows and a kitchen that is not also a living room, study, and bedroom also helps.
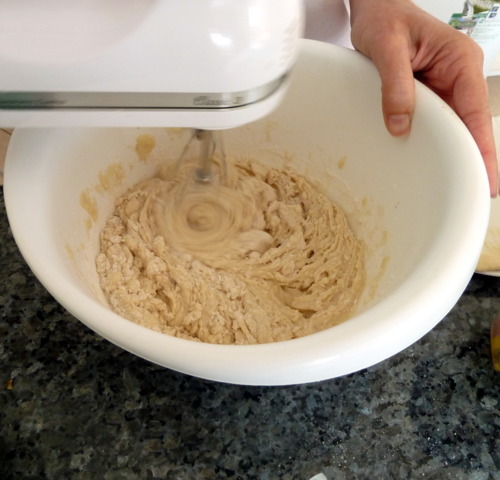
To start out, cream the butter and sugar together.
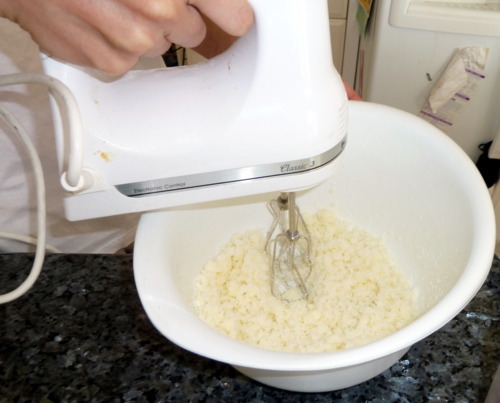
Shall I tell you a secret? This is one of my favorite parts of baking. I love how fluffy the butter and sugar mixture gets. Care to hear another? I have no idea how I would get by without a mixer of some sort.
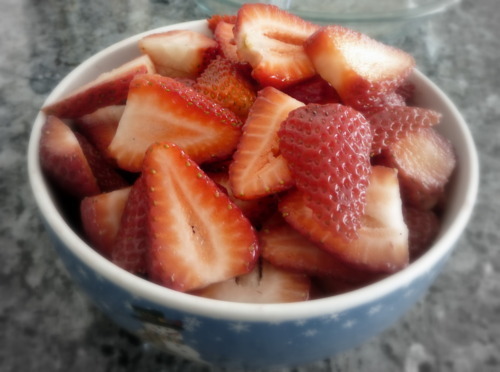
Next mix in the egg, milk and vanilla. If you happen to have some extra hands in the kitchen, have one measure out the dry ingredients in a separate, small bowl and a second clean and cut the strawberries.
(Please try not let this remind you too much of a porcelain throne.)
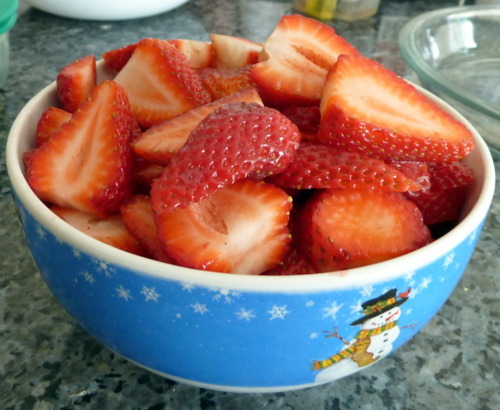
A word of advice, don’t cut your strawberries like this. Just take off the tops and slice them in half, even if they are big strawberries. The thin slices didn’t give me enough strawberry-ness in the end. The snowman bowl, however, is highly recommended.
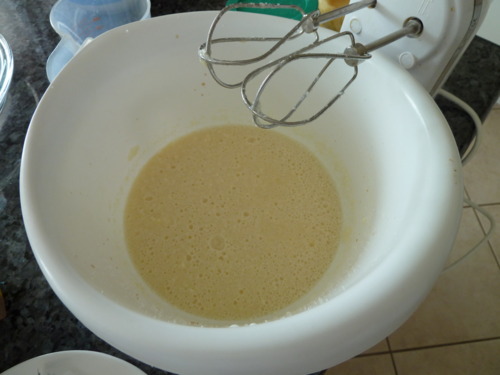
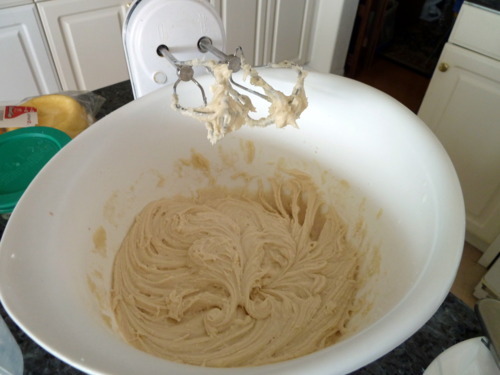
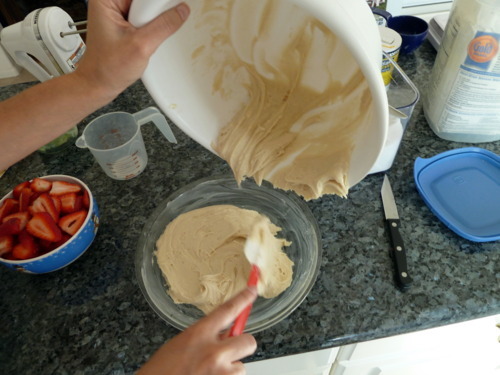
Gradually add in the dry mixture and mix until just smooth.

Don’t forget to periodically scrape the sides of the bowl to ensure you’re not getting all the dry ingredients in. I love spatulas, by the way. They are magical beings.
Next pour the batter into a greased baking apparatus. I used a regular pie plate. I could have used a bit more space. A deep dish pie plate or a springform cake pan would be great. I was at my mom’s, though, so I settled for a regular pie plate.
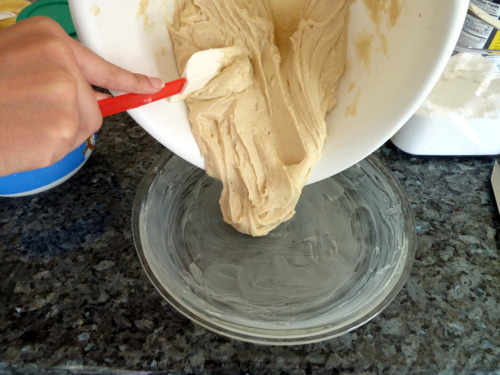
I was a very zealous greaser that morning. I used butter and everything! None of that spray-on non-stick stuff. (I am very eager to try Baker’s Joy someday, though, which is supposed to be the equivalent to greasing and flouring in a spray!)
Use the spatula to spread the cake in the pan and then start adding those strawberries on top! You can layer them on as closely packed as you like, but try to keep it to a single layer.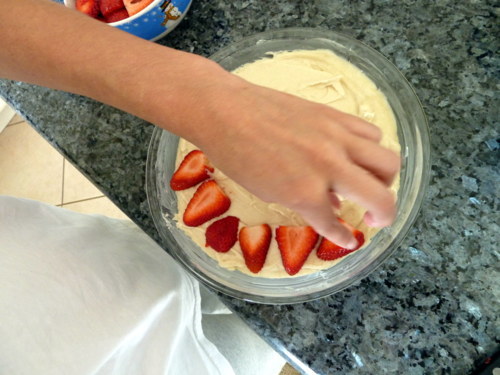
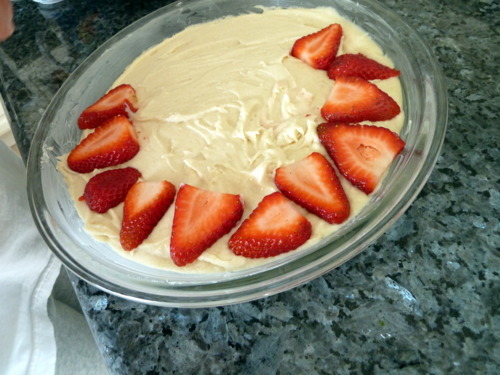
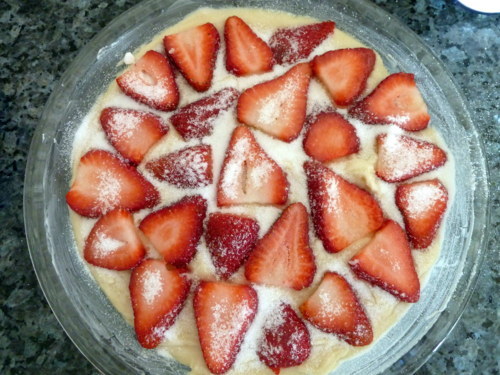
Once all the strawberries you want are layered on, sprinkle around two tablespoons of sugar over the top before you pop it in the oven.

Don’t worry if it looks like this after 50 minutes. Just keep it in there for 10-15 more minutes and that still-moist center will start to behave.

Just before you are ready to serve it, dust the top with some powdered sugar. I had a lot of fun doing this! I just put some powdered sugar in a mesh strainer and tapped the side to make it snow. If you have a flour sifter, that would also work. Serve it up with some whipped cream or vanilla ice cream or both! Whipped cream alone is the best, though it’s possible I am biased as I am not a huge fan of vanilla ice cream.
Strawberry Summer Cake
Recipe from Smitten Kitchen
6 tablespoons unsalted butter, at room temperature + extra for greasing baking apparatus
1 1/2 cups all-purpose flour (if you have the time and energy, I might sift the flour as I thought the cake turned out a little bit on the flour-y side)
1 1/2 tsp baking powder
1/2 tsp salt
1 cup + 2 tablespoons granulated sugar
1 large egg
1/2 cup milk
1 tsp vanilla extract
1 lb strawberries, hulled and halved
Savor and look forward to a summer that hopefully has less disappointing weather than last year!
As a side note, the photographer of the above photos has requested that I share with you what we made last night.
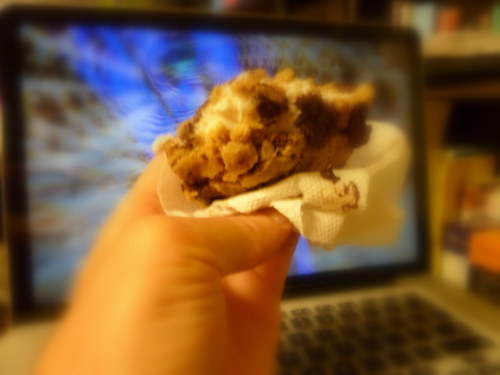
It’s like a dream, right? let’s just bring that into a bit more focus…

There we go. Delectable, delicious ice cream sandwiches with cookies (not those silly chocolate wafer things they sell in stores…)! Watch out, Diddy Riese.
Yes, that is a snowman on that bowl. I’m just a tad bit early for Christmas in July…
Either way, it is time to start breaking out those summer recipes. You know, the ones that are good for summer BBQ potlucks and 4th of July parties? I came across this recipe for a strawberry summer cake last month and fortunately had the perfect excuse to make it last weekend, a very special someone’s 75th birthday! I love this special someone with all my heart as this person put a significant amount of time and effort into looking after me as I was growing up. I now take great delight in being a chauffeur to this person when I can, continuing to listen to her awesome stories, and going out for coffee on weekend mornings. The photos for this recipe were graciously taken by a boy I happen to be particularly fond of. That is why they look so much better than my usual pictures. Being at my mom’s house with huge windows and a kitchen that is not also a living room, study, and bedroom also helps.
To start out, cream the butter and sugar together.
Shall I tell you a secret? This is one of my favorite parts of baking. I love how fluffy the butter and sugar mixture gets. Care to hear another? I have no idea how I would get by without a mixer of some sort.
Next mix in the egg, milk and vanilla. If you happen to have some extra hands in the kitchen, have one measure out the dry ingredients in a separate, small bowl and a second clean and cut the strawberries.
(Please try not let this remind you too much of a porcelain throne.)
A word of advice, don’t cut your strawberries like this. Just take off the tops and slice them in half, even if they are big strawberries. The thin slices didn’t give me enough strawberry-ness in the end. The snowman bowl, however, is highly recommended.
Gradually add in the dry mixture and mix until just smooth.
Don’t forget to periodically scrape the sides of the bowl to ensure you’re not getting all the dry ingredients in. I love spatulas, by the way. They are magical beings.
Next pour the batter into a greased baking apparatus. I used a regular pie plate. I could have used a bit more space. A deep dish pie plate or a springform cake pan would be great. I was at my mom’s, though, so I settled for a regular pie plate.
I was a very zealous greaser that morning. I used butter and everything! None of that spray-on non-stick stuff. (I am very eager to try Baker’s Joy someday, though, which is supposed to be the equivalent to greasing and flouring in a spray!)
Use the spatula to spread the cake in the pan and then start adding those strawberries on top! You can layer them on as closely packed as you like, but try to keep it to a single layer.
Once all the strawberries you want are layered on, sprinkle around two tablespoons of sugar over the top before you pop it in the oven.
Don’t worry if it looks like this after 50 minutes. Just keep it in there for 10-15 more minutes and that still-moist center will start to behave.
Just before you are ready to serve it, dust the top with some powdered sugar. I had a lot of fun doing this! I just put some powdered sugar in a mesh strainer and tapped the side to make it snow. If you have a flour sifter, that would also work. Serve it up with some whipped cream or vanilla ice cream or both! Whipped cream alone is the best, though it’s possible I am biased as I am not a huge fan of vanilla ice cream.
Strawberry Summer Cake
Recipe from Smitten Kitchen
6 tablespoons unsalted butter, at room temperature + extra for greasing baking apparatus
1 1/2 cups all-purpose flour (if you have the time and energy, I might sift the flour as I thought the cake turned out a little bit on the flour-y side)
1 1/2 tsp baking powder
1/2 tsp salt
1 cup + 2 tablespoons granulated sugar
1 large egg
1/2 cup milk
1 tsp vanilla extract
1 lb strawberries, hulled and halved
- Preheat oven to 350°F. Butter a 10-inch pie pan or 9-inch deep-dish pie pan or a 9-/10- in. springform pan.
- Clean, hull and halve your strawberries. Try not to eat too many.
- In a small bowl, combine flour, baking powder & salt. Set aside.
- In a larger bowl, cream together butter and 1 cup sugar until pale and fluffy (about 3 minutes with an electric mixer).
- Mix in egg, milk and vanilla until just combined.
- Gradually add dry ingredients. Mix until just smooth.
- Pour into prepared baking apparatus. Use spatula to spread the batter into a fairly even layer.
- Arrange strawberries, cut side down, on top of the batter. Make a good thick layer (confluent, anyone?) without layering them on top of each other too much. Sprinkle the remaining 2 tablespoons of sugar over the top.
- Bake for 10 minutes at 350 F. Reduce temperature to 325 F and bake roughly 50-60 minutes until golden brown and a tester inserted into the center comes out free of cake batter (ooey, gooey strawberries are a-ok).
- Let it cool in a pan on a rack. Cut into wedges. Serve with yummy goodness, otherwise known as whipped cream and/or ice cream, as your preference or supplies dictate.
Savor and look forward to a summer that hopefully has less disappointing weather than last year!
As a side note, the photographer of the above photos has requested that I share with you what we made last night.
It’s like a dream, right? let’s just bring that into a bit more focus…
There we go. Delectable, delicious ice cream sandwiches with cookies (not those silly chocolate wafer things they sell in stores…)! Watch out, Diddy Riese.
Subscribe to:
Posts (Atom)